Let's be clear, I know nothing at all

"You Will Never Walk Alone"
Showing posts with label Earth-moving.. Show all posts

Sunday

4 IN ONE BUCKET REBUILD - REPAIRS


Costly damage can be caused to equipment when routine maintenance is not carried out or overlooked.

Here is a case example of this.

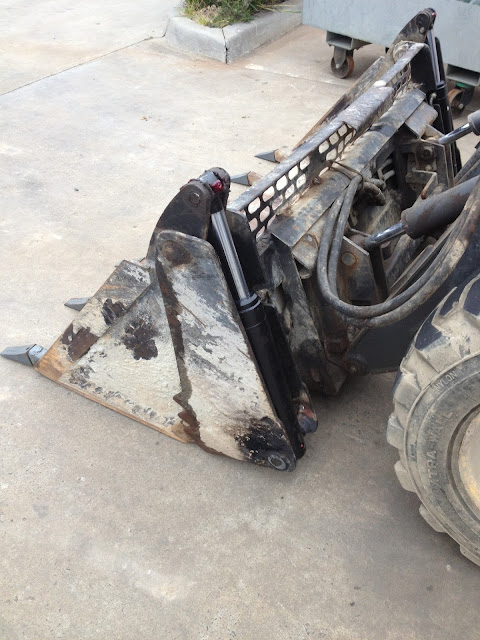
After operating the skid steer loader in the mud and slosh the operator was most probably tired and fed-up. He parked the machine and never gave it a thought again until the 4 in-one bucket rams started leaking oil profusely.

It seemed strange that both cylinders would start leaking at exactly the same time.

Can you spot the reason why?


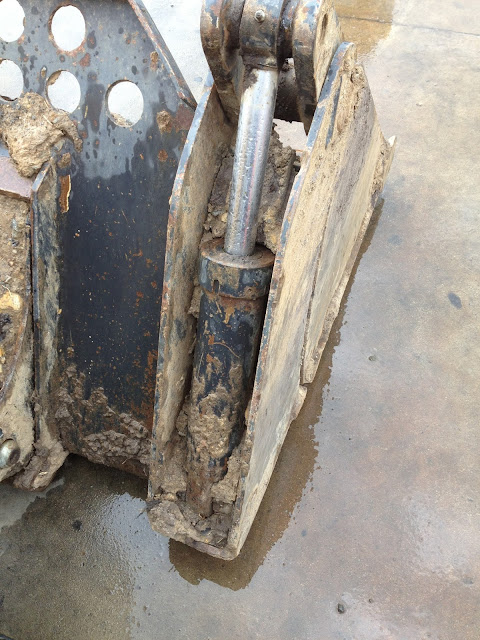
Mud has filled the cavity that the hydraulic cylinder is housed in.


Notice the damage to the shaft and the hard mud caked to the back of the ram.


The mud has made a solid wedge behind the ram.


Left hand side cylinder does not look any better.


New rams on the left - Bent rams to the centre - Old cylinder to the right.


New rams modified to fit and installed to the 4 way bucket.


Grease nipples greased up and grease path checked.


So what was the problem?
Well as you have rightly guessed, the ram shafts bent like bananas , wore the seals and leaked oil.
But how or why did this happen?
Yes that's right, the hard mud did not allow the cylinder to pivot as the bucket was opened and closed.
The hydraulic force was far greater and stronger that the ram rod and so bent it.

Conclusion - Proper routine maintenance would have prevented this failure.
After each muddy operation machines and equipment should be washed down as soon as possible
 and all mud and debris removed.
Months of poor maintenance caused this problem.

Implement Preventative Maintenance! 

Friday

Dynapac CC102 Twin Vibrating Roller / Drum mounting rubbers / Drum insulators / Drum shock arsters replaced


We have bought and sold many of these rollers in the past few years.
Something we take particular care about is checking on the drum shock rubbers.
These have a tendency to give way over a period of time.

Please view all the technical specs , operator manual , spares manual , and repair manual , all for free download on the link below.


Below is a photo of a new and a destroyed drum mounting rubber.
As per usual, one side comes adrift, when this happens to more than one rubber mounting the machine leans over to the one side badly.


Here are some good examples of this type of failure.


Well, lets us begin with the replacement.
We are replacing the mounting rubbers on the RHS front of this machine.
First we remove the outside securing bolts and nuts , these are nyloc's and if they have had a hart time on a civil site they could become a challenge to remove.


Next we remove the safety covers that protect the hydraulic lines.


Now is the time to support the machine with a jack if you have not yet done so.


With the aid of a large impact air wrench, remove the 6 bolts that secure the support arm to the frame of the machine. Be careful, there is a large and heavy spacer come lifting lug that just falls out if you are not wide awake.


Now the leg is divorced from the machine, and can be lifted carefully off the hydraulic motor, the  hoses need to be removed and tucked up slowly maneuver the arm and  she will come free.
Notice the heavy spacer / lifting lug on the floor.


hoses tucked up and out of the way, now we begin with the removal of the mounting rubbers.
They are held in place with Allen cap screws. Be sure to insert the Allen key well, if you strip the head you will have to drill the bolt out. Not much fun at all. Below is the special Allen key we fabricated to reach the cap screws.


Replace the mounting rubbers / shocks / insulators with the new one's.
These can be bought aftermarket, we have used them for some time now and can  not fault them.
Cheapest route is to import them from States, postage and price of the part still well below the price asked for aftermarket parts here in Australia.


To complete the job, fit the side arm back in place and assemble in the reverse order. Make sure to use the rattle gun when fastening the 6 arm bolts to the machine, all those good vibrations could make it come loose.


Oh, please don't forget to check the hydraulic fluid level when the job is done, it is difficult to say how much oil leaks out when the hoses are removed.


Wednesday

KOBELCO SLEW RING / BEARING REFURBISHMENT AND REPLACEMENT.

EXCAVATOR SLEW RING / BEARING REMOVED,RECONDITIONED, AND REPLACED.


This old girl presents her self at the workshop with a great deal of free-play between the undercarriage and the top of the machine.
Close examination reveals that the slew bearing has lost the plot. The grease line or tube that feeds grease to the ball-race in the slew bearing has come adrift. For some time now there has been no lubrication to the bearing. That I guess means wear, yes plenty of it.


Step No 1. Remove the digger boom. We have found it is always handy to cap all the hydraulic pipes and colour code them with cable ties. This makes assembly a real  treat.


Next free all the bolts and hoses that mate the machine to the undercarriage. Here take care not to forget even the smallest of hoses, including the cause of the problem, the grease line to the slew bearing.
Sling the machine, and up and away we go!


Photo view of the underside of the machine. Notice the slew drive gear poking it's nose out, we have another post on this type of repair. Click here to go to it.

With both parts of the excavator safely on the ground again we can start with the really dirty work. On this machine the slew drive motor also has to come out. This is because there is just too much "slop" or free travel between the left and right control.
Here Nathan inspects the damage and advises we replace the seals in the rotary valve at the same time.


So here we are, the slew ring still bolted to the undercarriage.
In the center we have the rotary valve.
Nathan's finger points to where the bolts that secure the slew ring to the undercarriage should be.


Yep! they are there! With the aid of the impact driver they all come out and the slew ring is free.

After cleaning the slew ring it became evident that not only did it not get clean fresh grease, it also had a great deal of ingress, dirt, mud, water and the like. Because the grease was not being replenished all the time , this ingress became a toxic form of grinding paste. 
Soon the slew bearing collapsed, with some of the balls in the race not even turning.
The only solution , a new one OR a refurbishment.
We opted for the latter and that was carried out by a professional Bearing Dealer.

CLICK HERE TO VIEW POST ON SLEW BEARINGS

Two weeks later we are back in business ,this time we are in the assembly game.

All cleaned up and painted, the undercarriage is ready to be mated to the machine.
Here the slew bearing is not fitted to the undercarriage. It is waiting in the background with the grease gun.


And there you are, one slew ring bolted to the undercarriage.

Stand clear, here comes the forklift driver, with the top part, heavy but well balanced.

And down she goes, nice and slowly, that's the way!

Nothing to challenging about this all, "To easy Mate" as we say here in Australia. Just look how relaxed the forklift driver is.

Bolt down the slew bearing, connect all the hydraulic pipes that you marked or tagged up front, connect the electrics and yes last but by no means the least - the cause of the problem - connect the grease line to the slew bearing!


Sunday

YANMAR Vio 40 TRACK DRIVE MOTOR REBUILD.


YANMAR VIO 40 excavator has bad oil leak on the track drive motor.
Closer inspection revealed that the seal between the drive hub and the mounting flange had given way. 

A new seal kit was located complete with all the o rings and the large steel compression seals.


We start stripping the drive unit and remove the old worn compression seal with it's steel slip ring.


Notice the steel slip ring and the rubber o ring that seals and provides the constant pressure on the seal.


The new slip ring is at the bottom, the old one is on the top one.
Can you spot the contamination wear marks on the old slip ring?
Notice the machine ground finish to the new component.


The contamination between the drive unit and the drive hub slowly wears away the sealing face on the slip seal.
This drive hub was filled with hydraulic oil though, a sure sign that the motor drive seal had popped.
This caused the hydraulic oil to leak into the drive unit and pressurise it.
The leak seen below was most probably caused by over pressure.


in the bottom left corner is the drive motor seal that caused the leak into the drive unit.
Made from special nitrate this seal is best replaced with the genuine item, the after market parts do not last!


A view of the planetary gears inside the hub assembly.


All assembled and bench tested, the tracks replaced and away we go.
This repair requires a fair amount for technical skill, mostly a generous portion of patience , fitting the slip seal.


Friday

Fire Fighting Truck Up-grade.

Let's get ready for the bush fire season. We start with a Roadworthy check and repairs.
Followed by a run-down of the fire fighting pumps. Here we encountered our first challenge. The main pump was very noisy and also leaking plenty of oil.

Blocked drain hole on the pump flange caused the pump shaft to corrode and then the seal to fail.


Below is the old pump and the control panel. Many of the valves were leaking and the fittings were badly corroded. The owners decided to turf the set-up and replace the pump with the more reliable Davey Pump.


Old foot well and pumps removed, ready to make way for the new.


 Davey Pump fitted to the new foot well and plumbed up to the tanker.
We designed a new plumbing system that could pump water out the front under the bumper, out the rear under the bumper , from the fire fighting hose reel, and the mass discharge pipe at the rear.


The new foot well with pump mounted.


 Lengths of suction hose were also made up and stored in the hose trays fitted to the tanker.

Notice the sprayers under the bumper, and the mass discharge pipe on top of the tanker.

Inside the rear sliding toolbox we hung  the rolls of  2" lay-flat hose along with all the ancillary fittings and the fire fighting hose reel.

Jerry can racks were made up and fitted to the LHS of the truck, petrol and diesel reserves.